
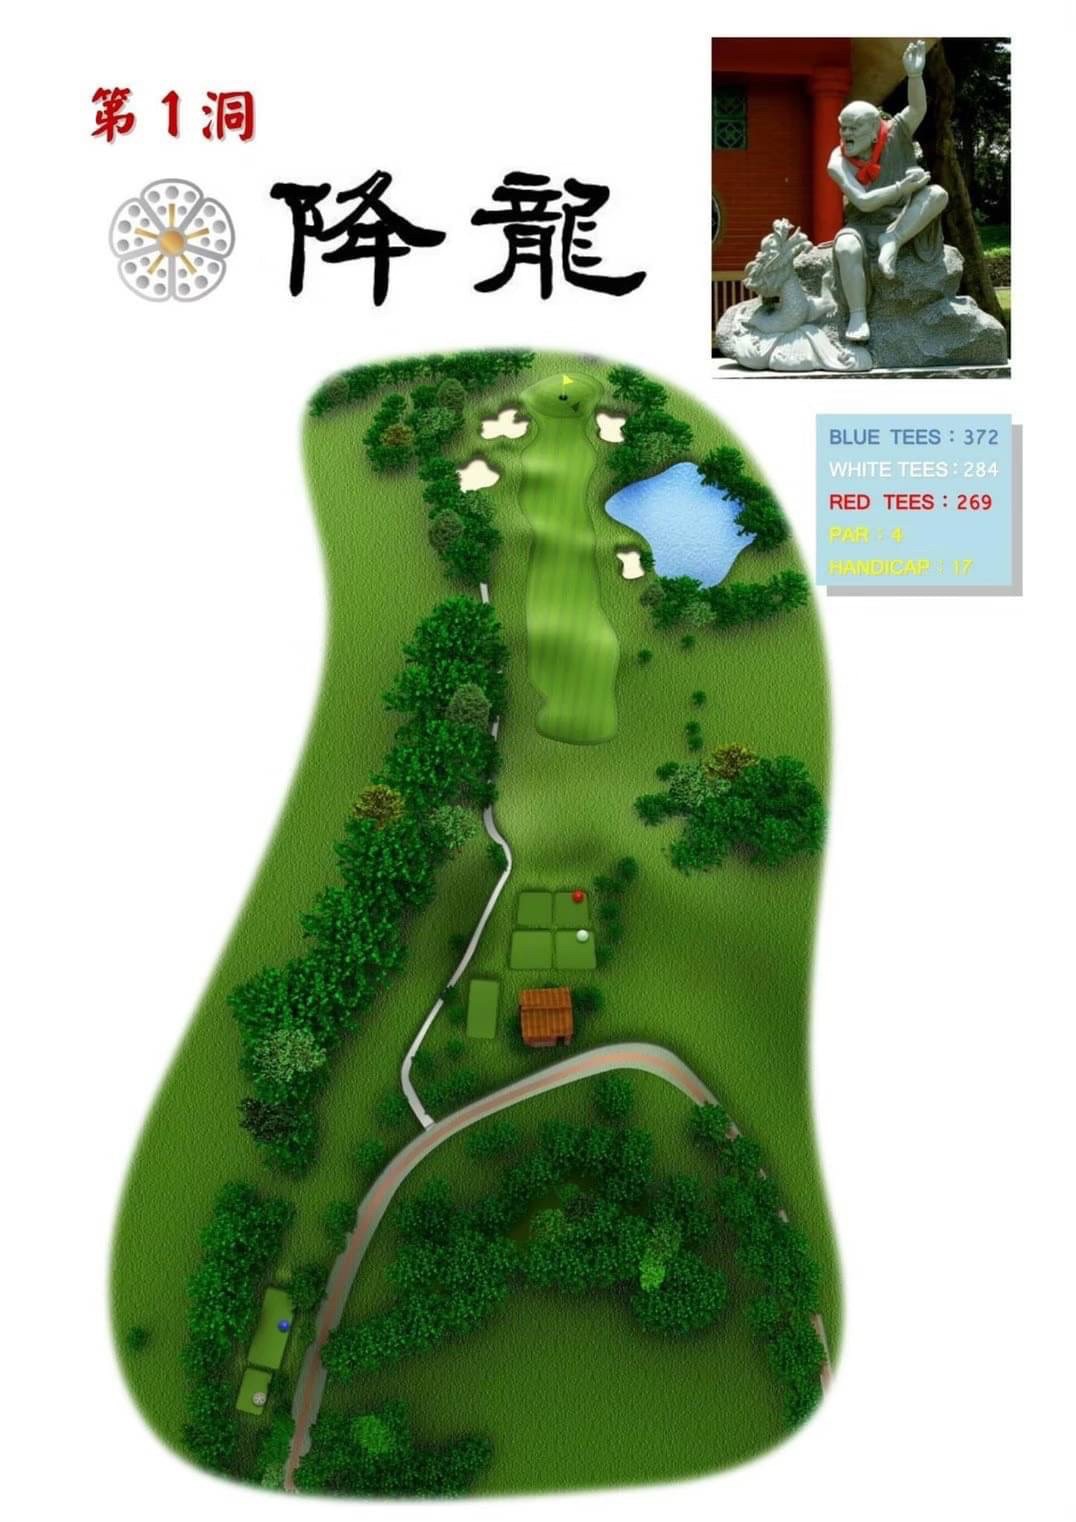
Hole 1: Descending Dragon Par 4
A short-distance par 4 hole with a water hazard on the right, marked as out of bounds, and a large tree obstructing the left side of the fairway. The priority for the tee shot is a straight trajectory, and golfers can opt for a fairway wood or a long iron to ensure the ball finds the fairway. This leaves an optimal distance for using a wedge or a 9-iron when approaching the green. When attacking the green, caution is advised for the large bunker on both sides, and due to the uphill slope, it is advised to add some extra distance.
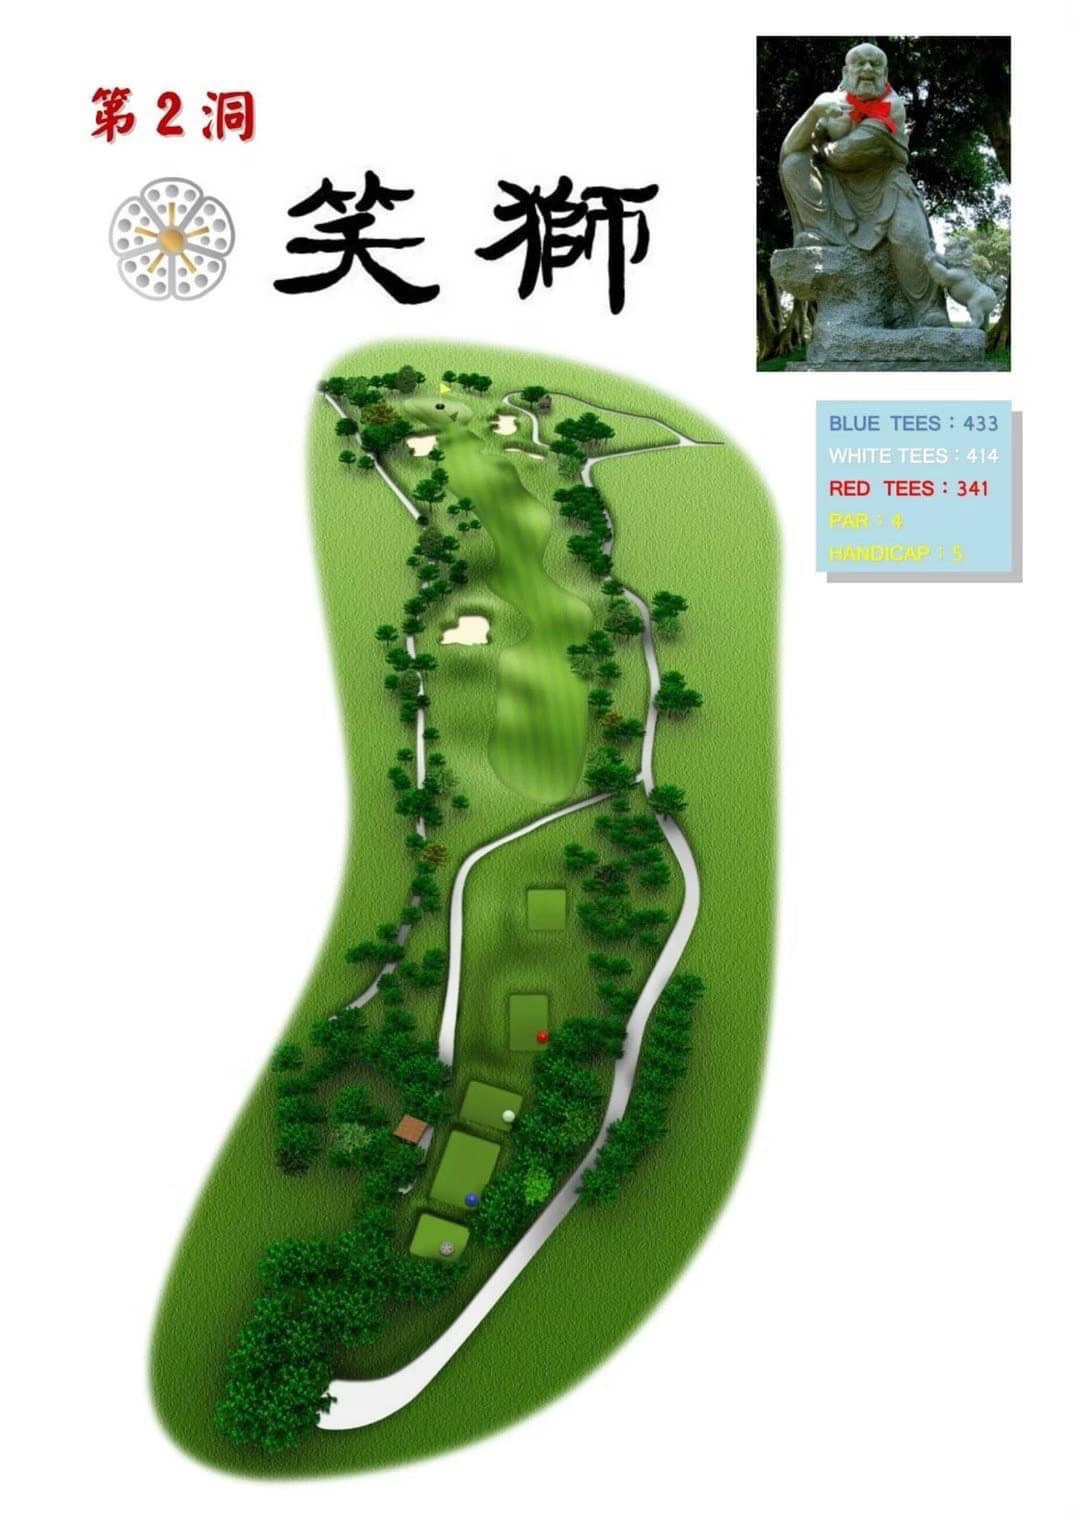
Hole 2: Smiling Lion Par 4
This is a long-distance hole with a slight left turn, with out-of-bounds on the right side of the fairway and a large bunker on the left side of the fairway. The ideal tee shot is to use a driver towards the left half of the fairway, leaving a distance of approximately within 150 yards. For the second shot, as the green is elevated, it is advised to add 5 yards to the distance.
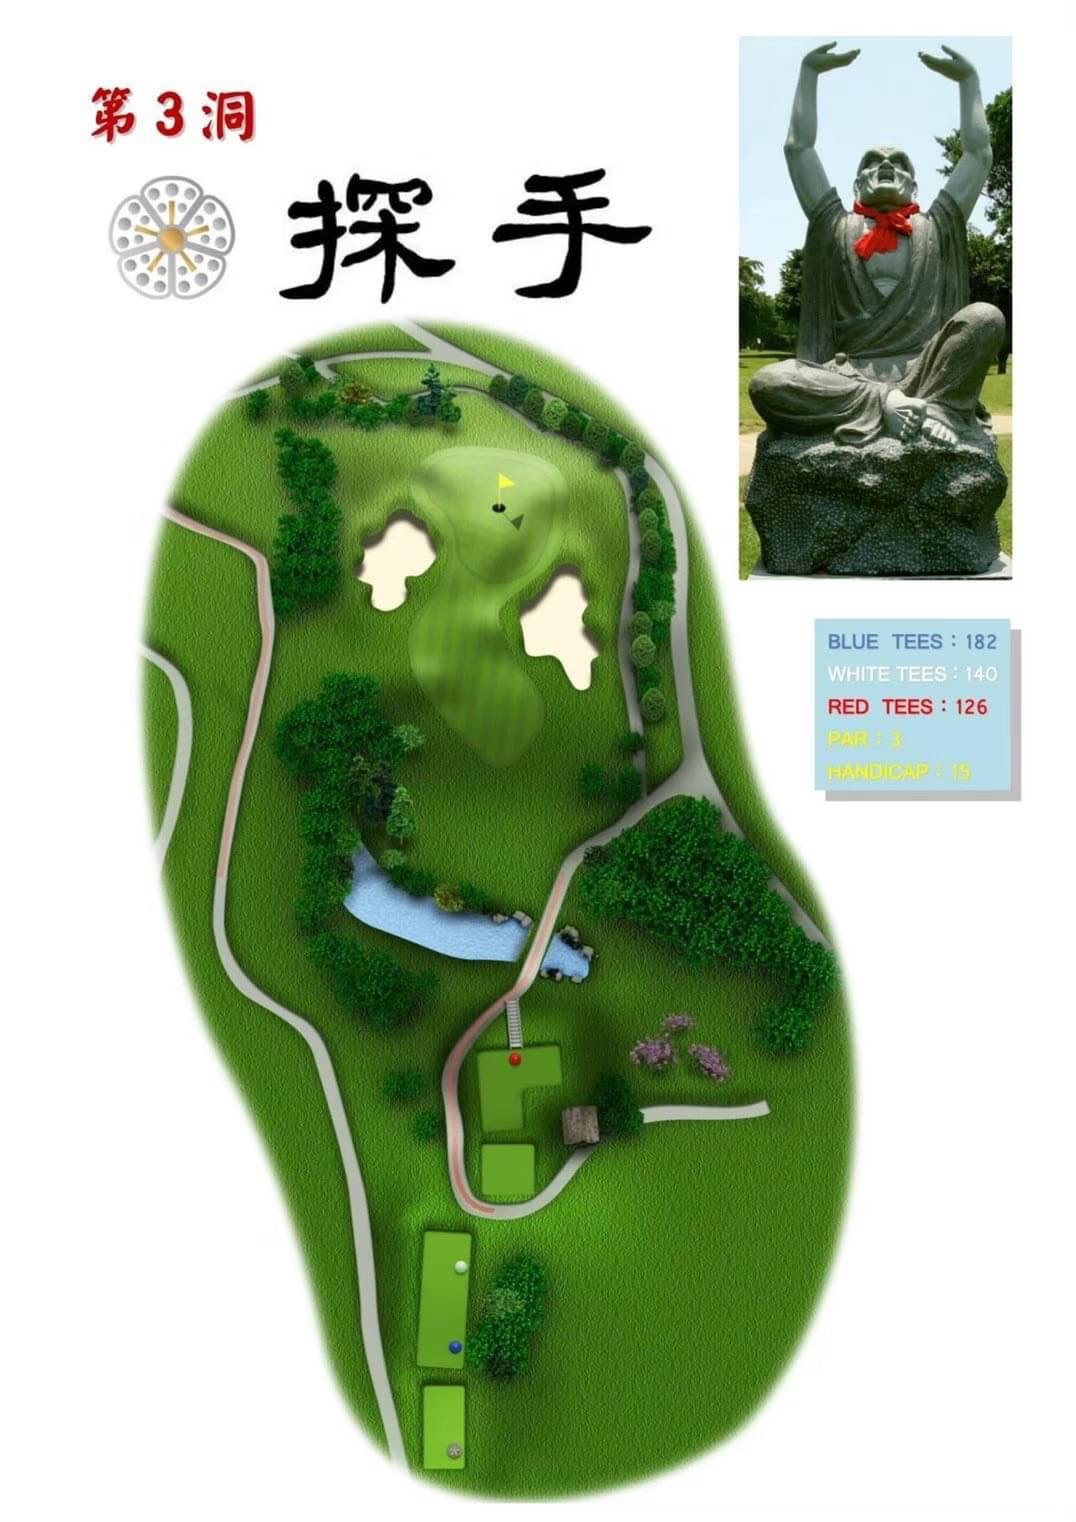
Hole 3: Reaching Out Par 3
A short par 3 hole where depending on the pin position, anything from a short iron to a mid-iron may be used. The green is quite large, and if the ball ends up too far from the flag after reaching the green, it can easily result in a three-putt. Therefore, it is recommended to ensure the distance is sufficient when hitting the shot.
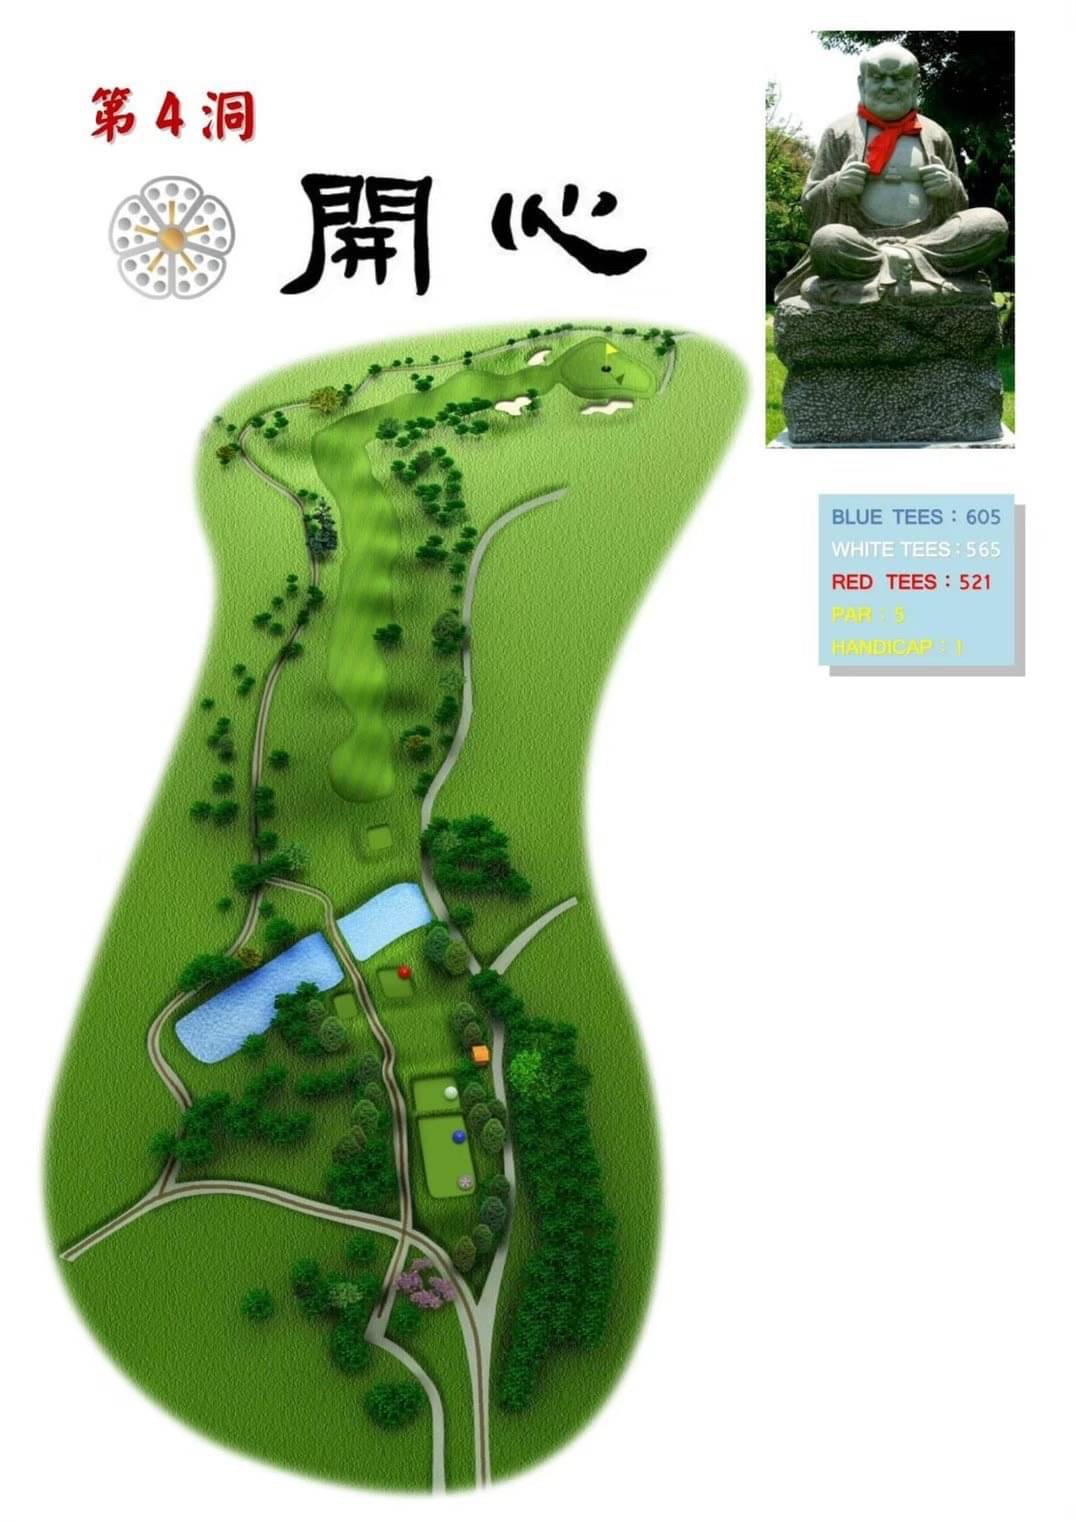
Hole 4: Joyful Par 5
For the tee shot, consider using a driver and aim towards the left half of the fairway. When planning the second shot, if a direct approach is challenging, carefully assess the distance between the ball and the trees on the right side. If the conditions are unfavorable, opting for a mid-iron shot to go around the corner is a viable strategy. The third shot will likely be from a downhill lie, facing an elevated green. It is recommended to use an extra club and employ a three-quarter swing to allow the ball to roll up to the green. Regardless of your playing style, this hole presents a challenging par 5.
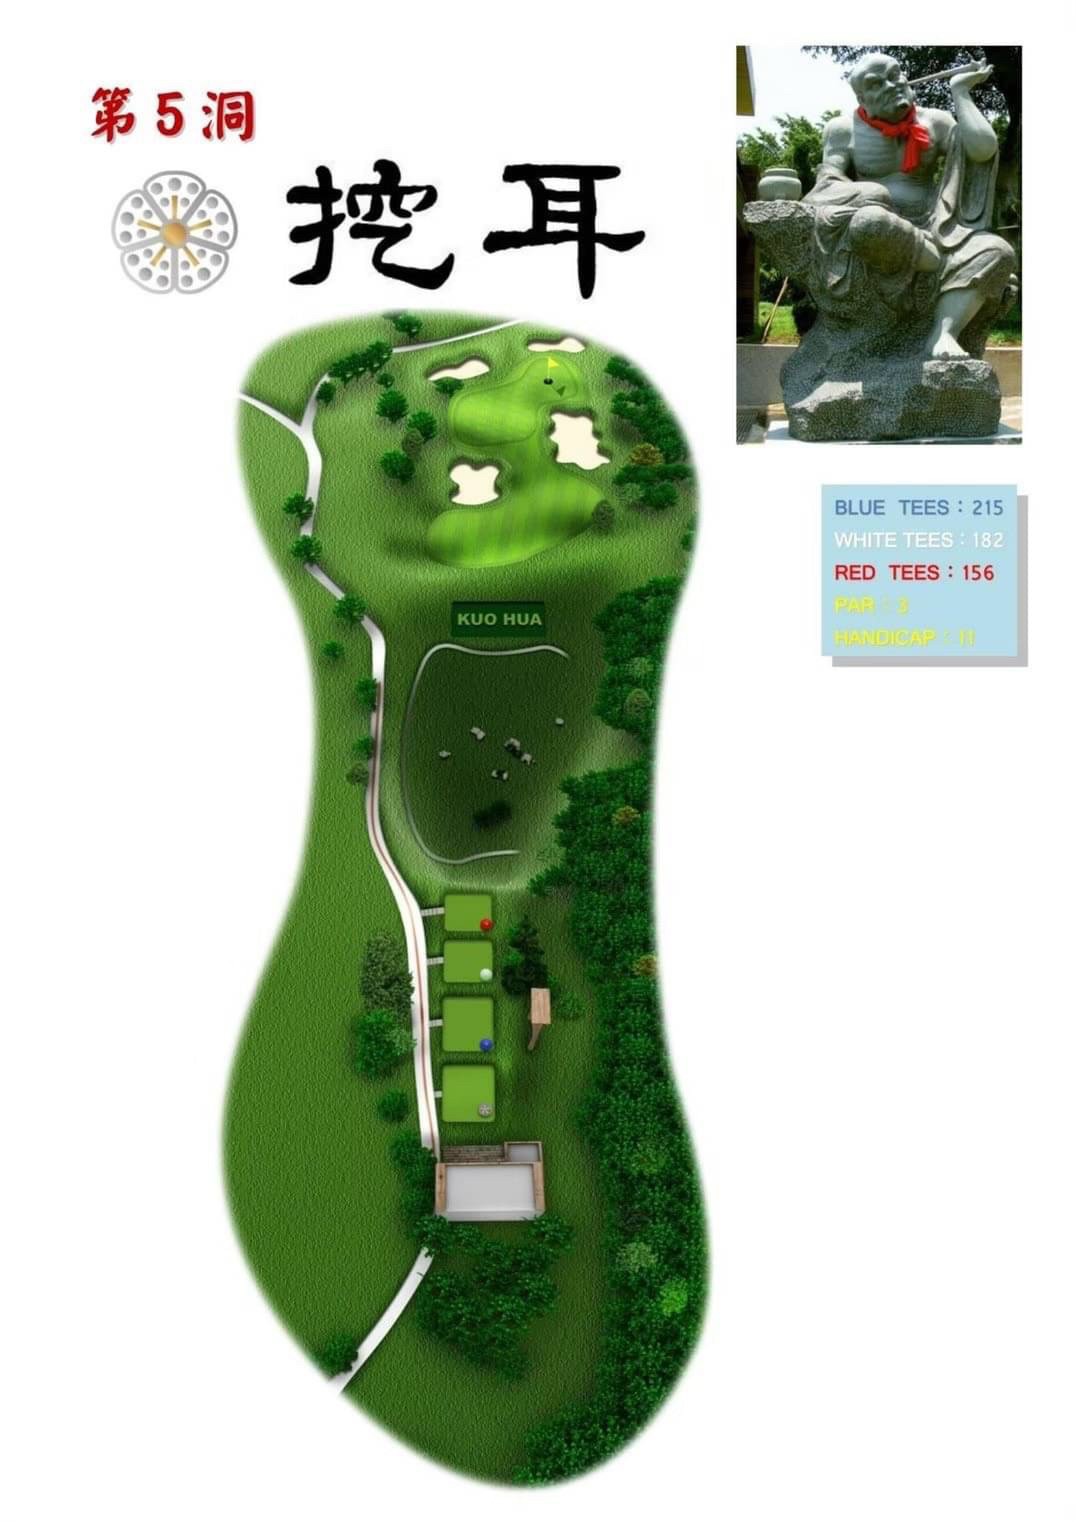
Hole 5: Ear Digging Par 3
This hole is widely considered one of the most challenging holes in Taiwan, featuring an oblong-shaped green guarded by large deep bunkers on the left and right fronts. Coming up short on the shot almost guarantees landing in a bunker, while too much force can result in your ball landing over the green. If the pin is positioned on the lower left side, a mid-iron is recommended, while the higher ground to the right rear may require the use of a long iron.
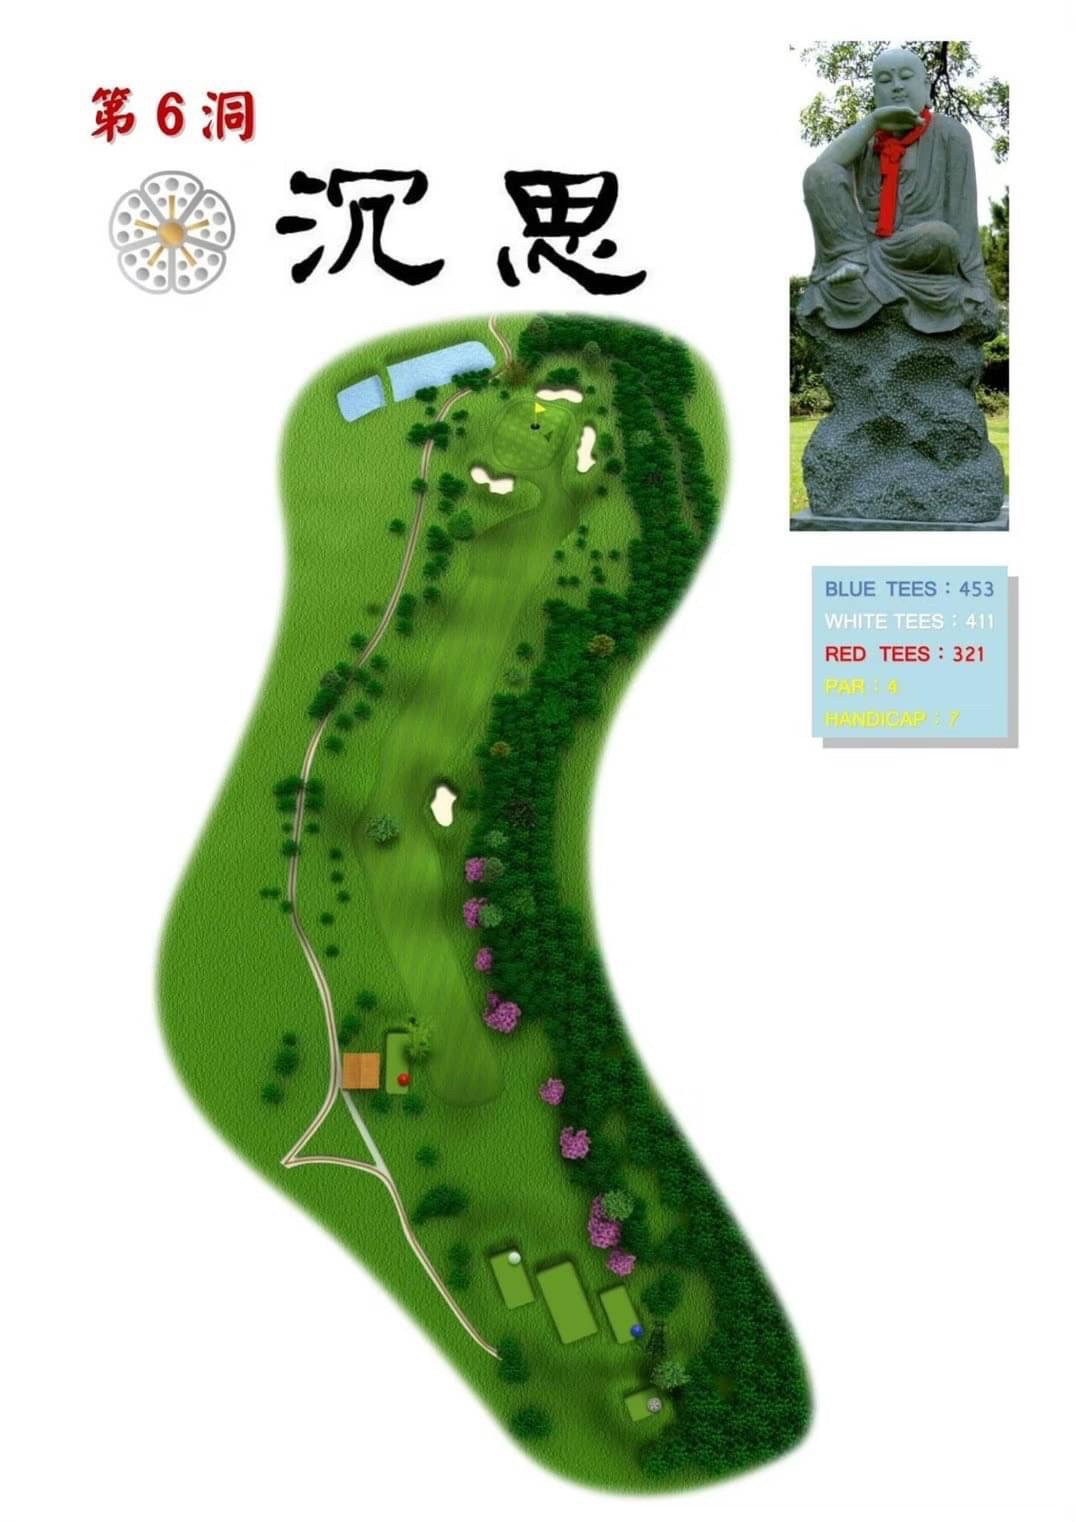
Hole 6: Contemplation Par 4
A highly classic dogleg hole design, featuring a right-turning fairway with sand bunkers on the right side, followed by out-of-bounds. There is a tree obstructing the middle of the fairway, and on the left side, there's a large wooded area from Hole 4. Hitting the fairway off the tee is a crucial requirement, and it's recommended to aim towards the left side of the fairway. If using a driver, a slight adjustment to the right may be necessary. Approaching the green is also challenging, as the left front of the green is mostly guarded by huge bunkers. When uncertain, it's advised to aim towards the right side of the green, where there is a clear pathway.
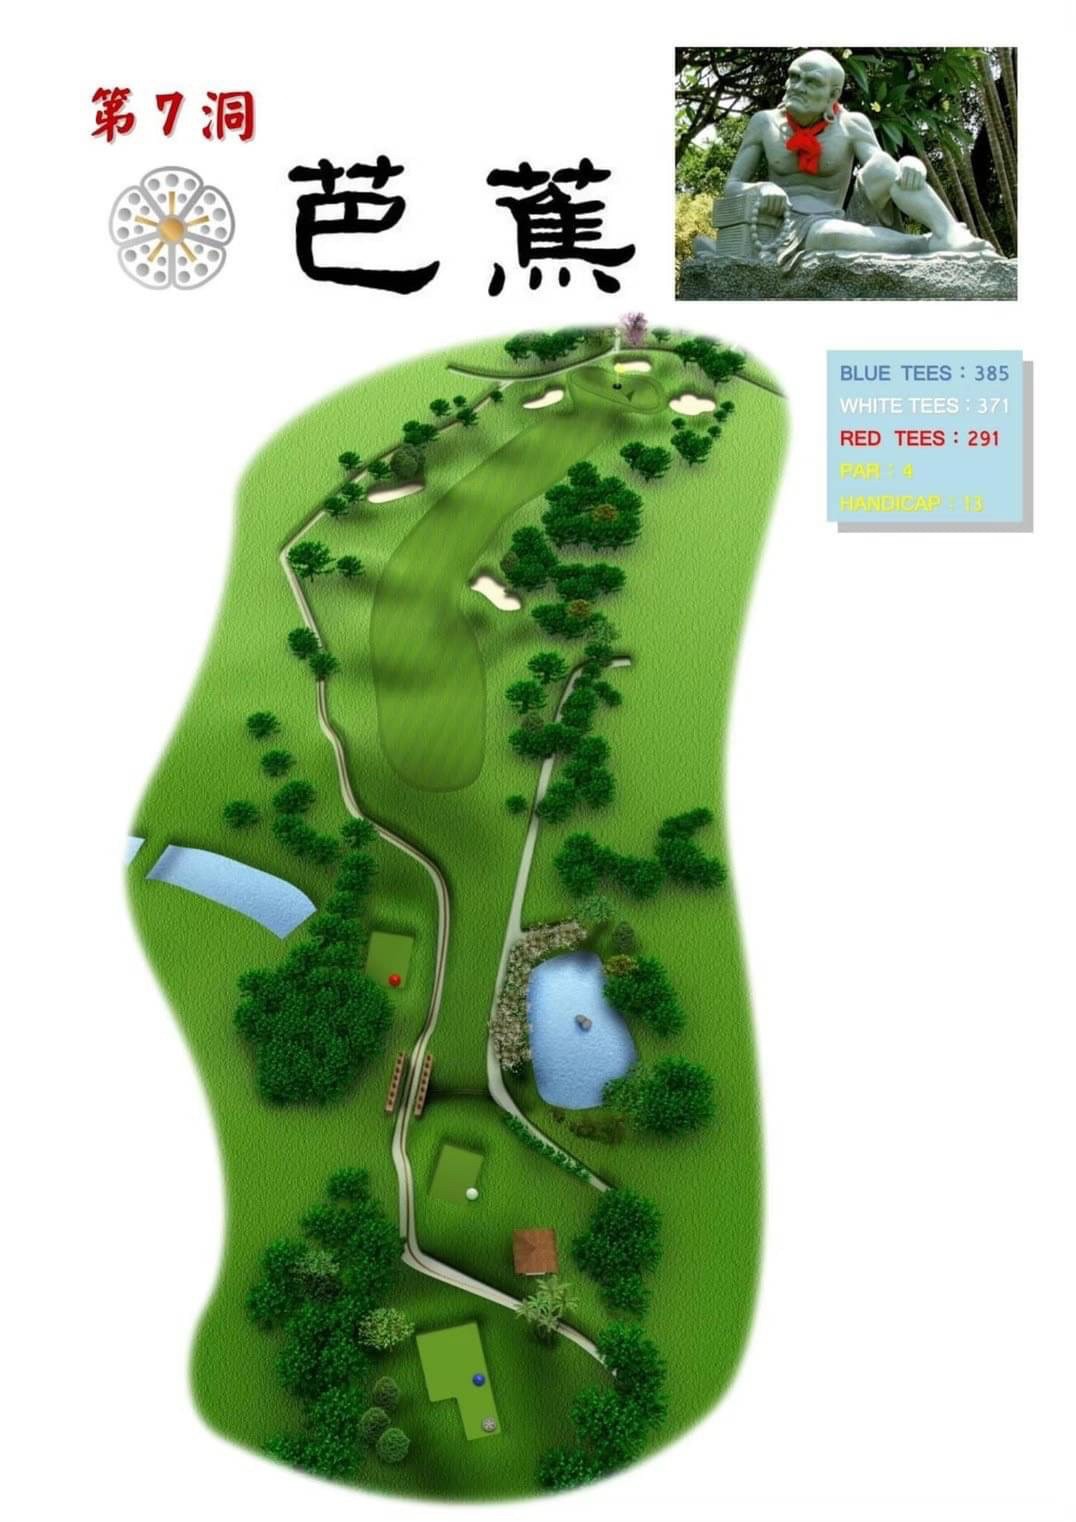
Hole 7: Banana Tree Par 4
The sand traps and trees at the right-turn corner of this hole may deceive you into attempting a direct shot, but doing so offers no advantages. The ideal tee shot should land on the left half of the fairway, and the second shot will likely be within the range of a short iron. Upon reaching the green, there are many subtle breaks and contours that may not be immediately apparent, so it's essential to consult with your caddy beforehand.
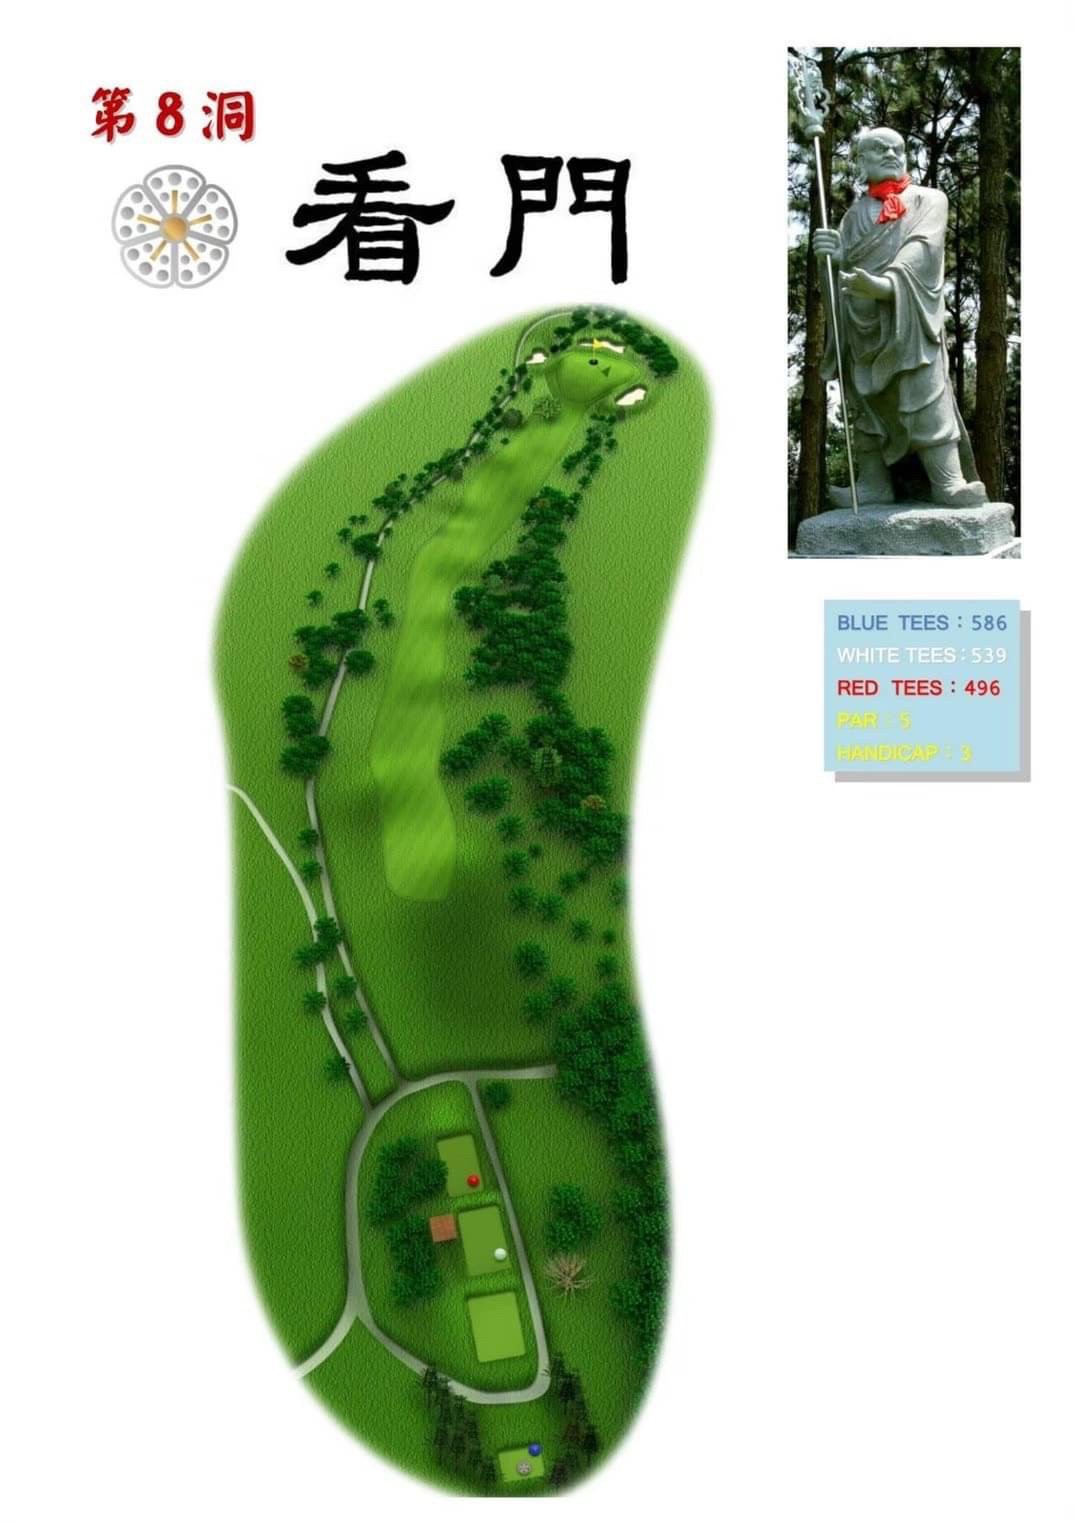
Hole 8: Sentry Par 5
There's no need to be over ambitious with your tee shot on this hole, avoiding trying to clear the trees on the right or aiming for an overly long drive. The landing area on the fairway is relatively narrow, so the key is to first get the ball onto the fairway and then carefully plan the second shot. The presence of tall trees in front of the green will obstruct your third shot if your second shot is likely to surpass their height. If your second shot is expected to clear the trees, it's crucial to choose one side to play to. Otherwise, it's advisable to stay within 120 yards in front of the green to steer clear of that tree.
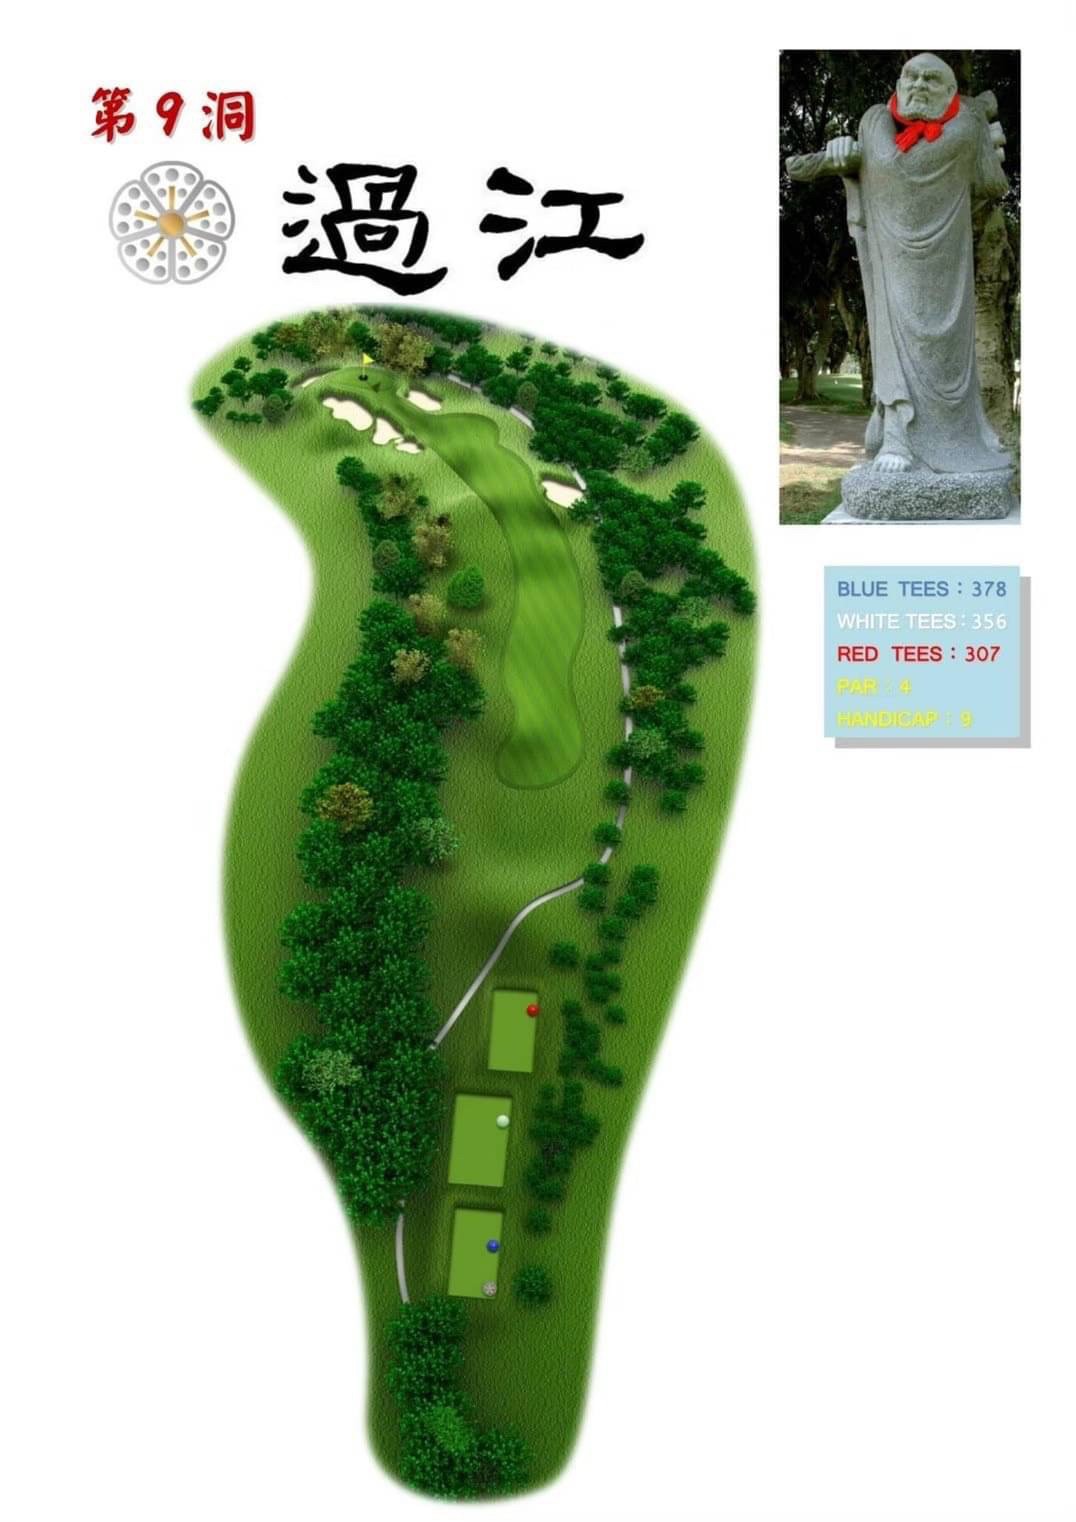
Hole 9: Crossing River Par 4
A short par 4 with a left dogleg, where placing the tee shot in the right spot is crucial. The second shot then aims to approach the elevated green. For the tee shot, it's recommended to aim towards the left half of the sloping fairway, allowing the ball to roll back onto the fairway. Shots veering to the right may leave an unfavorable angle for the second shot. The green is challenging to hold your ball, so attempting to land a high shot just onto the green is advised.
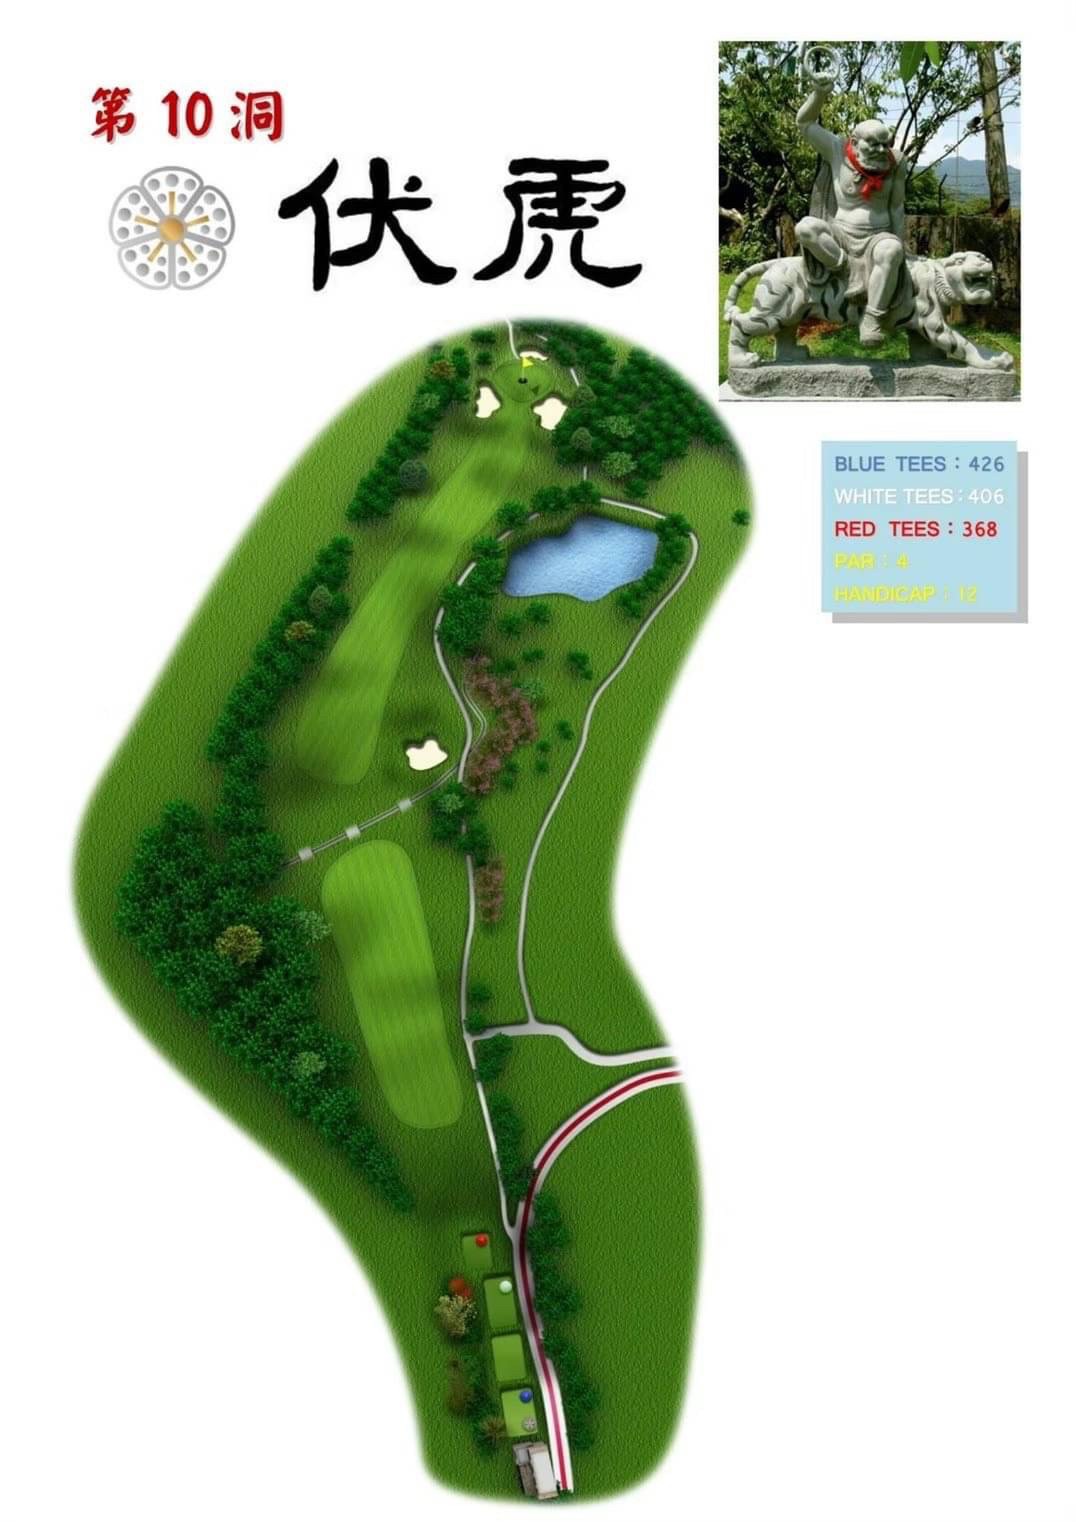
Hole 10: Hidden Tiger Par 4
A mid-distance par 4 with a right dogleg, where the right-turn corner is marked by bunkers, a water hazard, and out-of-bounds marks. On the left, there's a slope and trees, leading to out-of-bounds if ventured too far uphill. Keeping the tee shot on the fairway is crucial, and a 3-wood is recommended for the tee shot. The green is challenging to get a grip of your approaching ball, and with out-of-bounds at the rear, it's advised to aim for the front of the green and allow the ball to roll up.
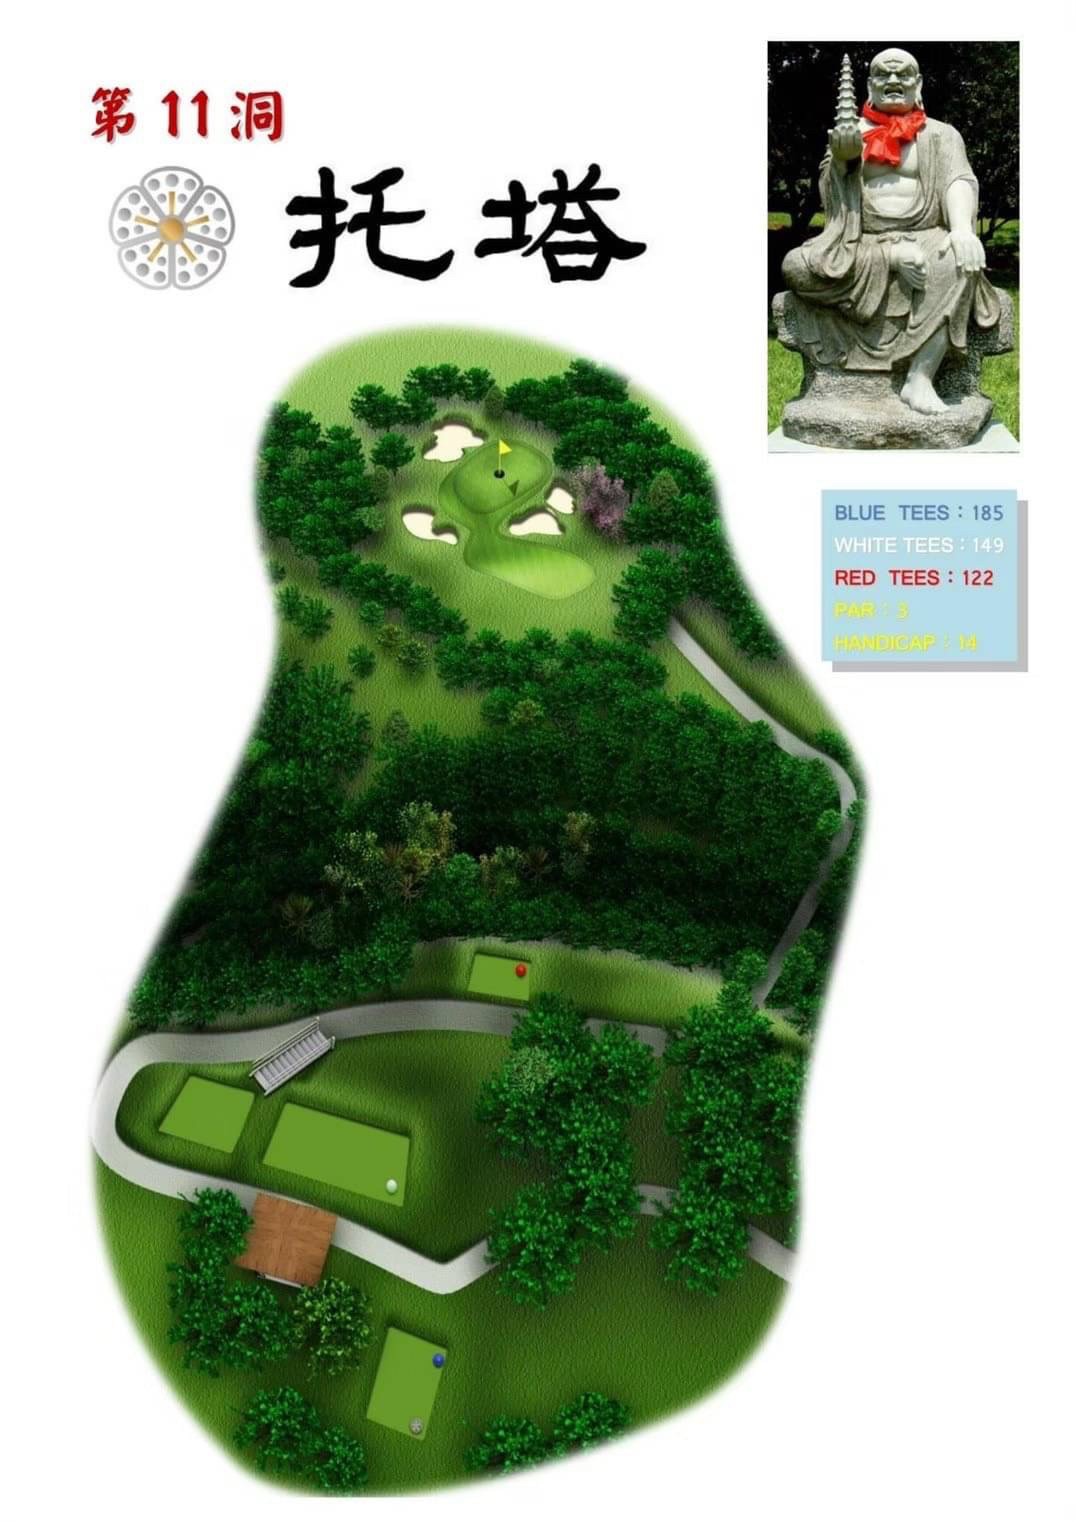
Hole 11: Totem Par 3
A par-three hole that spans over a valley. If there is a right-side wind, there's no need to aim for the right bunker; hitting the distance accurately is essential, but no extra distance is required. The green slopes from the right rear to the left front, making it challenging to handle if the ball hits over the green. Putting uphill can be quite slow and requires careful consideration of your ball speed.
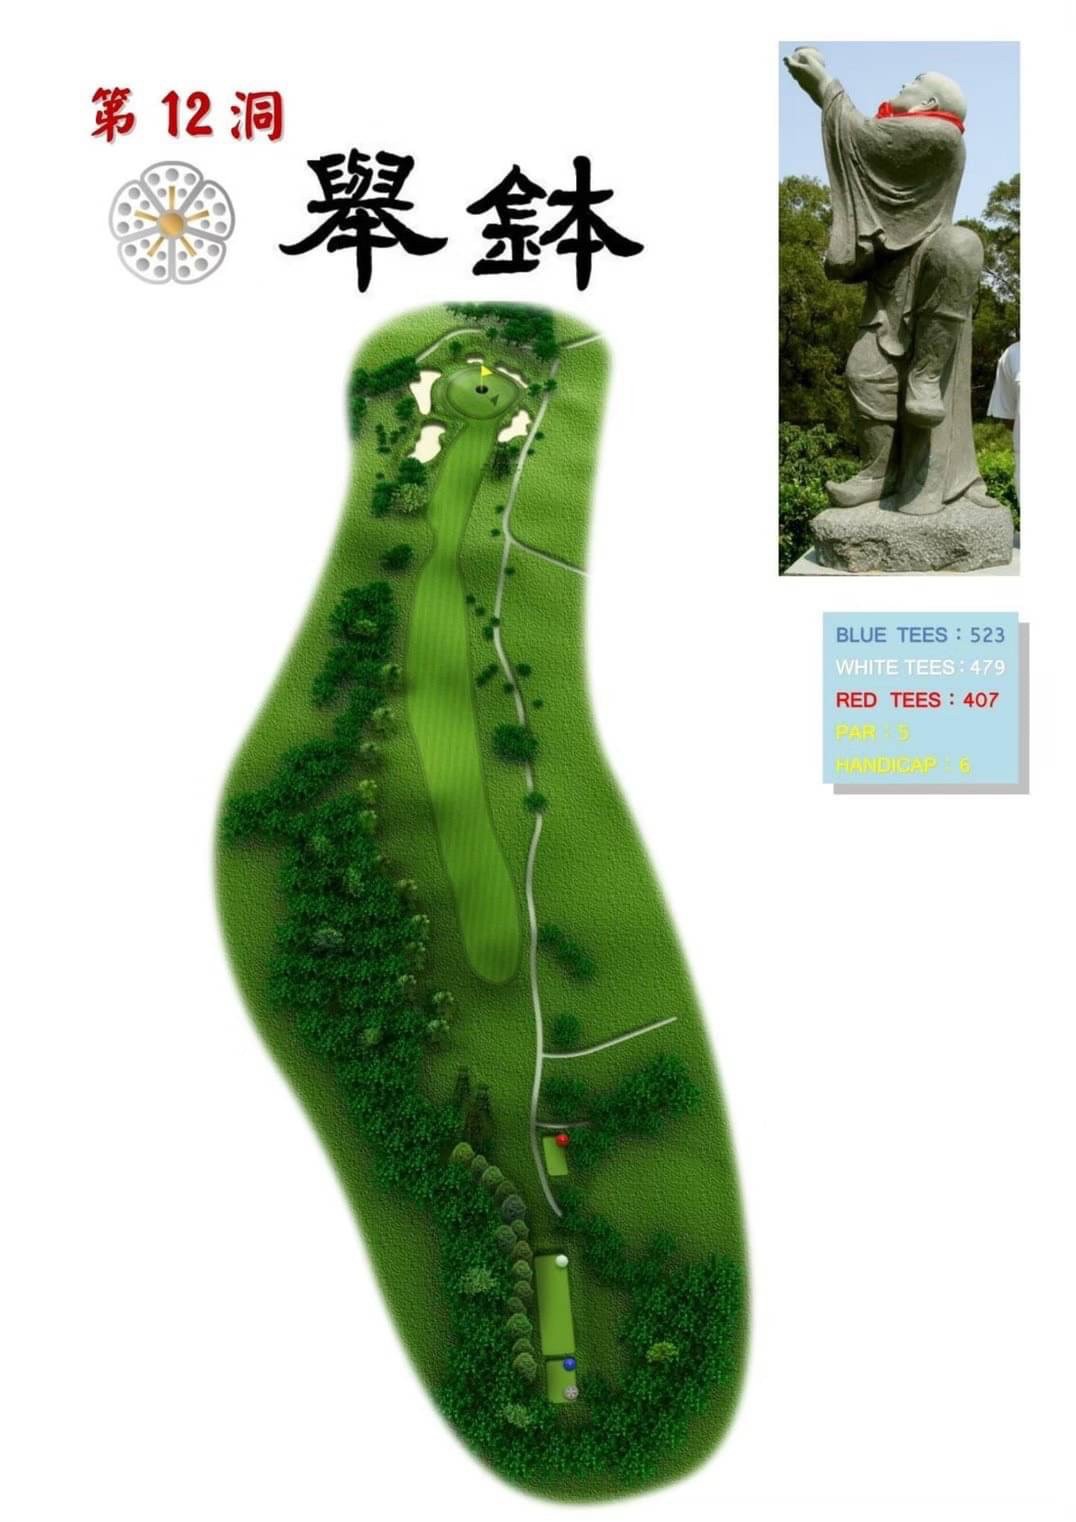
Hole 12: Raising the Bowl Par 5
An excellent opportunity for a birdie on this hole, this short-distance par 5 hole has out-of-bounds only on the left side. To attempt reaching the green in two shots, the tee shot must be placed on the left half of the fairway to have a proper angle, as there are trees on the right obstructing the approach. If reaching the green in two shots is not feasible, the second shot does not need to get too close to the green, avoiding the front bunkers on the left and right sides.
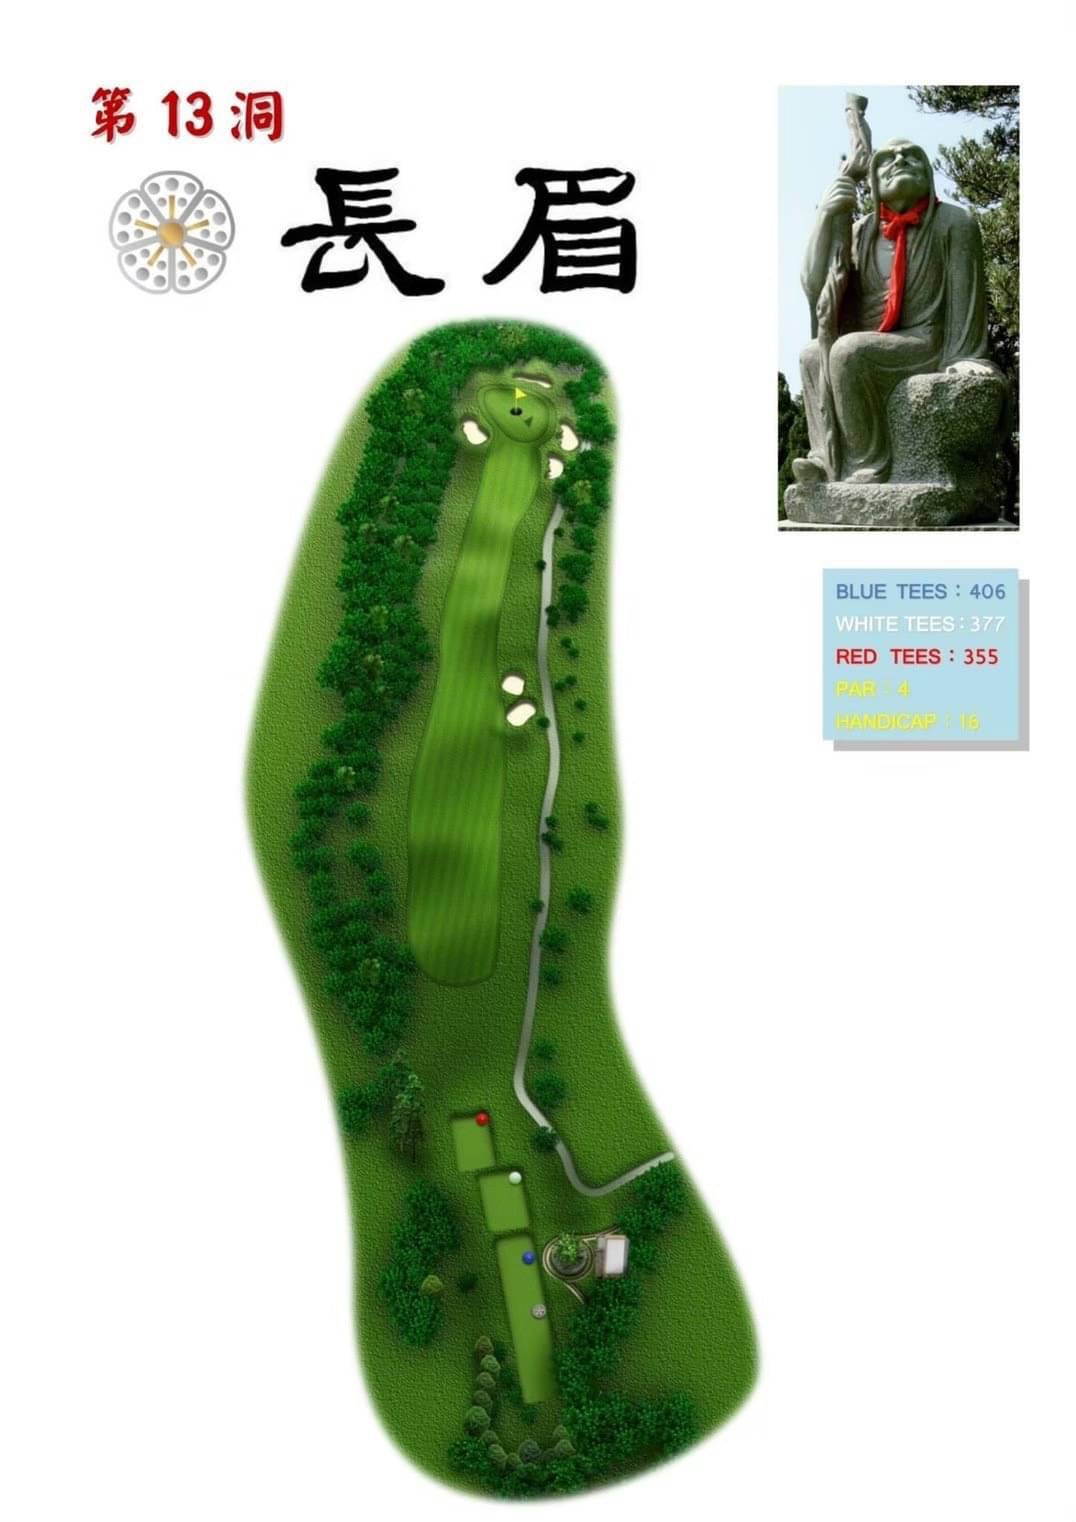
Hole 13: Raised Brow Par 4
A short par 4 with a significant downhill slope. For the tee shot, avoid being too ambitious. The left side of the fairway features a slope with tall grass, while the right side has bunkers and a slope. Exercise caution when attacking the green, as the green doesn't hold your ball, and there's out-of-bounds behind it. It's advised to prioritize accuracy over distance and avoid overly aggressive shots.
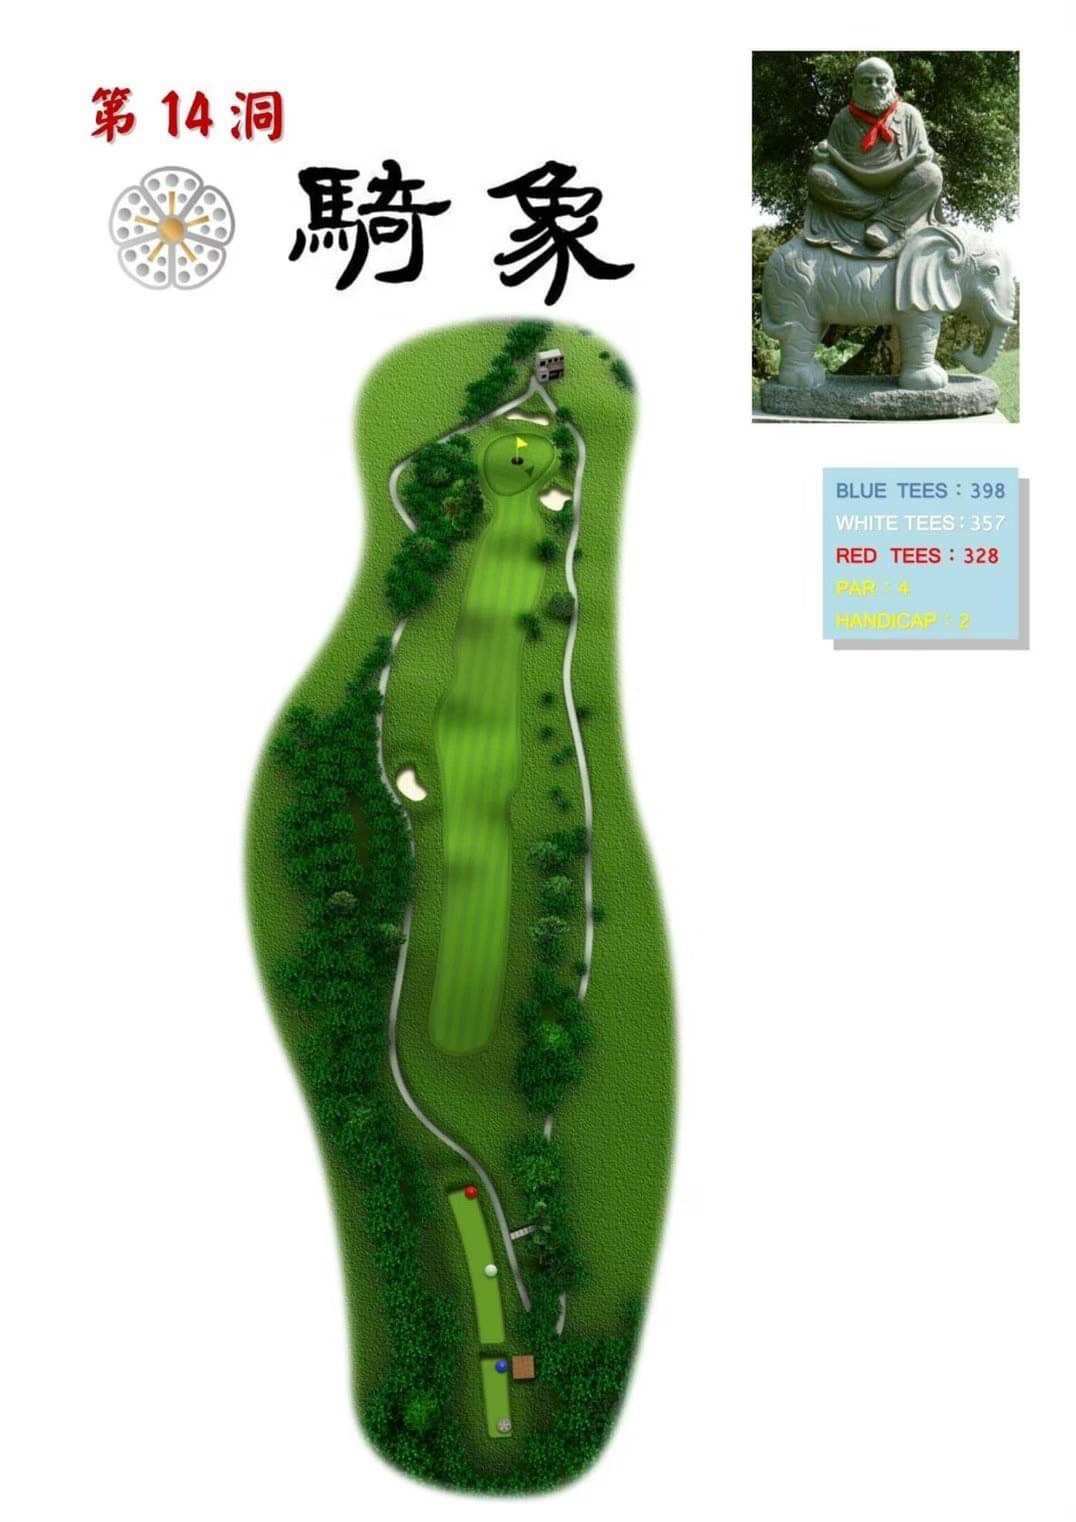
Hole 14: Riding Elephant Par 4
A continuously uphill par 4, where the distance between the first and second shots can be up to 30 yards. There's no need to be overly ambitious with the tee shot, as trees on both sides may obstruct the path. When approaching the green with the second shot, consider using a larger club, aiming to land the ball just onto the green. The green slopes from high at the back to low at the front, doesn't hold the ball well, and has a fast downhill and slow uphill slope.
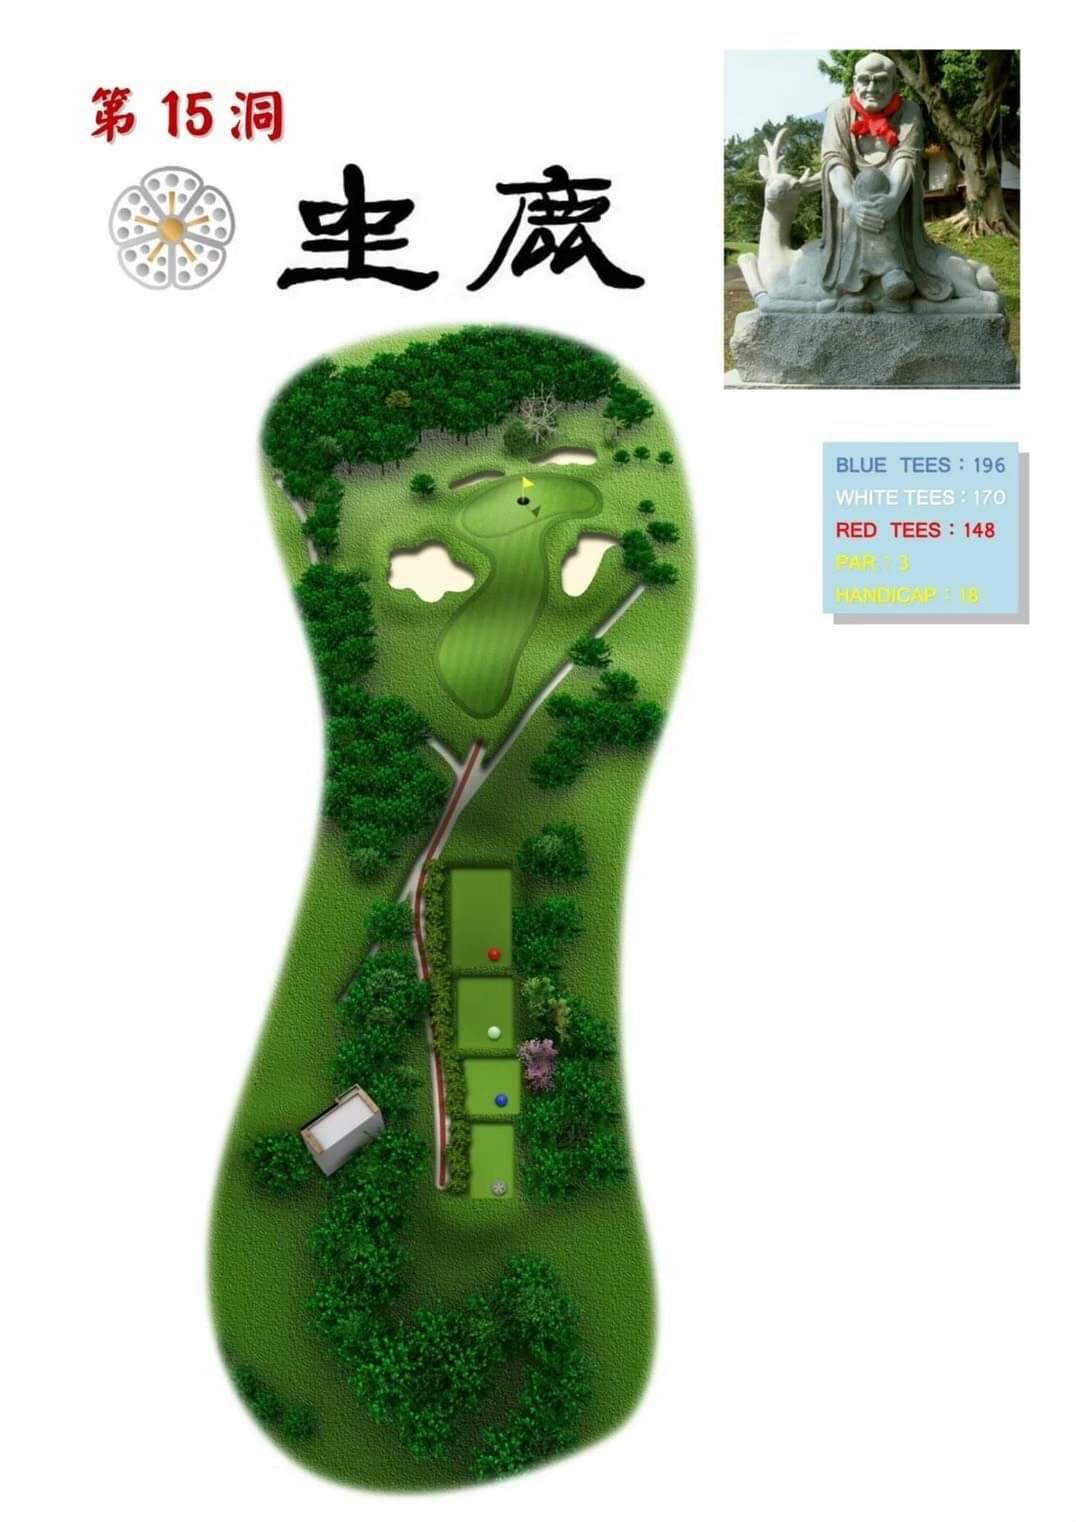
Hole 15: Seated Deer Par 3
A downhill par 3, where the open space around the green is susceptible to wind influence. However, when there is a crosswind, there's no need to aim beyond the green. It is recommended not to reduce the shot distance, ensuring that the ball clears the bunkers on both sides of the front green. If there is a headwind, consider adding a bit more distance to your shot.
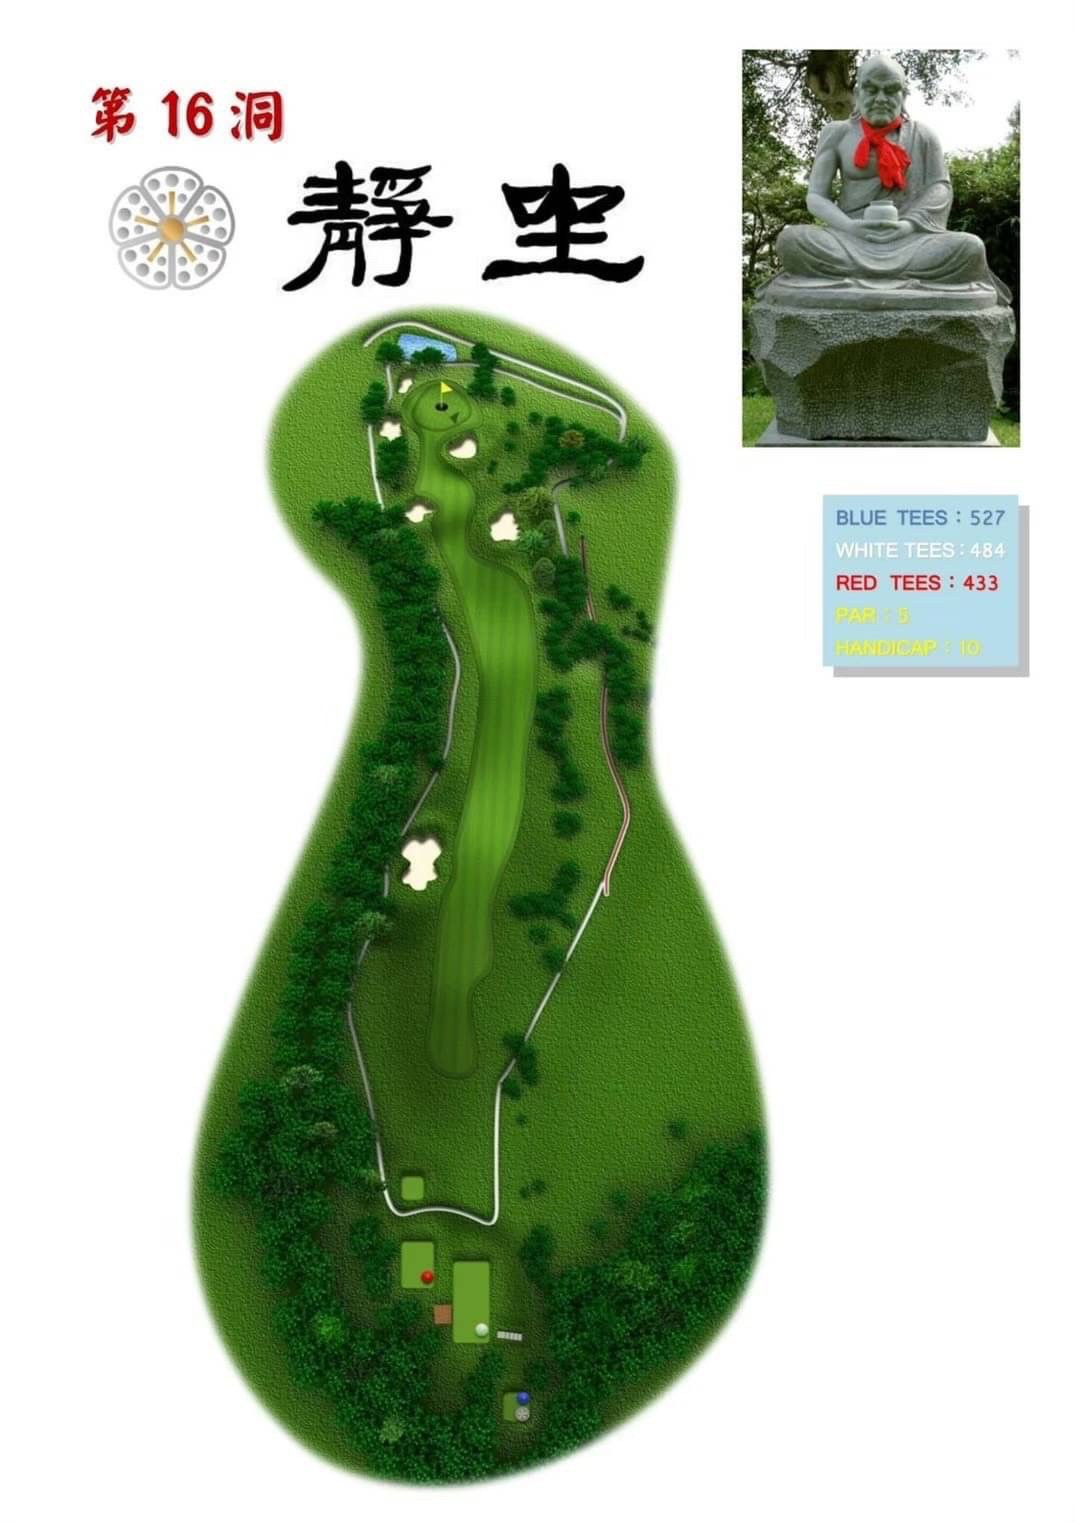
Hole 16: Meditation Par 5
A short par 5 with a straight front section and a slight left turn towards the back. The tee shot should be aimed to the right, as the fairway slopes severely to the left, with out-of-bounds on the left side. For the second shot, going directly at the green requires clearing a deep bunker and a large tree in front of the green. Unless you can hit a high shot, it's advised to play a safe shot to a position around 100 yards to the left front of the green. Similarly, this small green does not hold the ball well.

Hole 17: Sack Par 4
A blind uphill par 4, where trees on the left conceal an out-of-bounds area, and the right side forces a recovery shot. Tee shots that clear the fairway should allow for an approach with approximately a mid-iron to reach the green. If the distance is still too far, there's no need to force it; instead, place the ball within range before the green, avoiding the sand traps, and then make the third shot to approach the green.
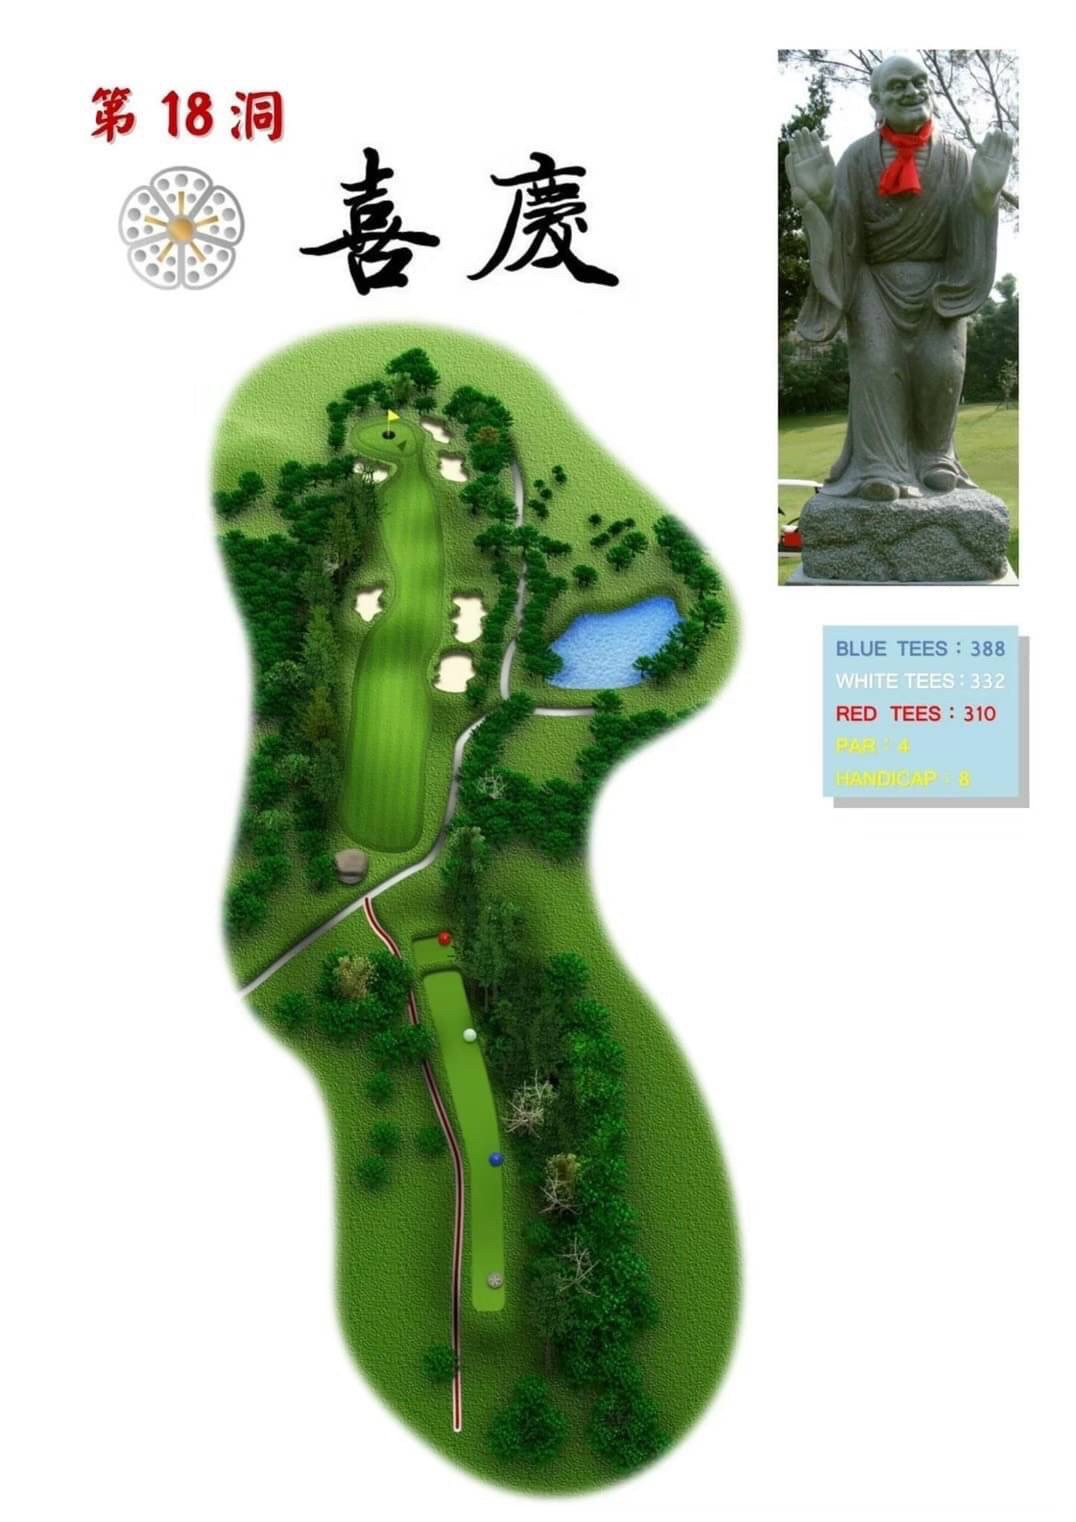
Hole 18: Celebration Par 4
An excellent finishing hole, don't assume that clearing the sand trap and large tree on the left will bring any advantages. The optimal second shot should be in the middle of the fairway, slightly to the right. However, be cautious, as there are bunkers on the right side of the fairway, followed by out-of-bound marks. The second shot faces a small green that doesn't hold the ball well, requiring extra distance. Still, as long as you clear the front bunker, you're in good condition for attacking the green.